If you’re new to online meetings or just getting started with Zoom, you’re in the right place. Zoom has become one of the most popular tools for video conferencing, online classes, and business meetings. Whether you’re hosting a quick catch-up with your team or a formal client presentation, knowing how to schedule a Zoom meeting saves you time and keeps things organized.
Let’s walk through each step simple, clear, and beginner-friendly.
Step 1: Sign In to Your Zoom Account
To start, go to zoom.us and sign in with your account credentials.
- If you don’t have an account yet, click on Sign Up, It’s Free and create one using your email, Google, or Facebook.
- Once you’re logged in, you’ll land on your Zoom dashboard.
Step 2: Click on “Schedule a Meeting”
On your dashboard, you’ll see several options New Meeting, Join, Schedule, and Share Screen.
- Click Schedule a Meeting to start setting up your meeting details.
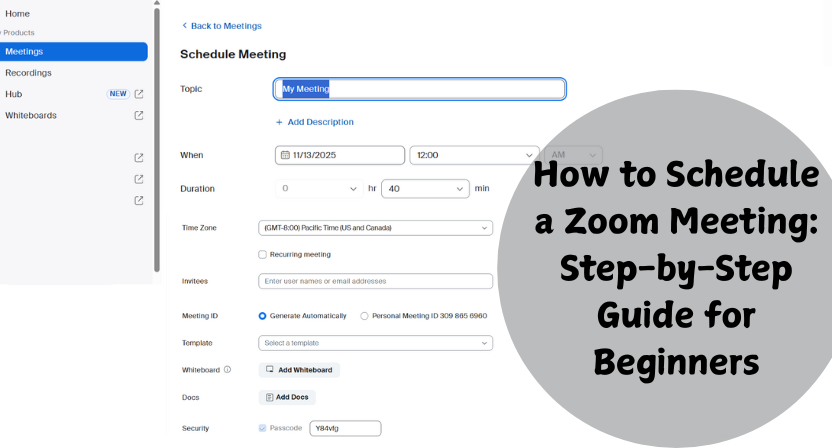
Step 3: Enter Your Meeting Details
Now comes the part where you personalize your meeting. You’ll need to fill in:
- Topic: Add a clear meeting title (e.g., “Weekly Marketing Sync” or “Client Discussion”).
- Description: (Optional) You can add short notes about the meeting agenda.
- Date & Time: Choose your preferred date, time, and duration.
- Time Zone: Double-check this so your attendees join at the right time.
If you plan to have the same meeting regularly, enable the Recurring meeting option.
Step 4: Set Meeting Options
Zoom gives you a few settings to enhance your meeting experience:
- Meeting ID: You can use a personal meeting ID or let Zoom generate one automatically.
- Passcode: Add a passcode to keep your meeting secure.
- Waiting Room: Let participants wait until you’re ready to start.
- Video Options: Choose whether the host and participants’ video should start automatically.
These options give you control over who joins and how the meeting begins.
Step 5: Add to Your Calendar (Optional but Handy!)
After saving your meeting, Zoom gives you the option to add it directly to your Google Calendar, Outlook, or Yahoo Calendar.
Adding it to your calendar ensures you get reminders, and you can easily share the invite with others.
Step 6: Share the Invitation
Once your meeting is scheduled, you’ll see an Invite Link.
- Copy this link and share it via email, chat, or any preferred communication channel.
- You can also click Copy Invitation to send the full meeting details including ID, passcode, and dial-in numbers (if any).
Step 7: Start Your Meeting on Time
When the time comes, just go to your Meetings tab in Zoom, find your scheduled session, and click Start.
Make sure your camera and microphone are working properly before beginning and you’re all set!
Handy Tips
- Always test your audio and video before the meeting.
- Use the Mute All option if you’re hosting a large group.
- Try enabling Record Meeting if you need to review or share it later.
Conclusion
Learning how to schedule a Zoom meeting is quick and straightforward once you get the hang of it. With just a few clicks, you can organize meetings, send invites, and stay connected effortlessly whether it’s for business, education, or personal use.
Zoom continues to make online communication simple, reliable, and accessible to everyone. So go ahead schedule your first meeting and enjoy a smooth virtual experience!